May 19 2023
5 min read


Jan
Digital signage installation can be tricky, especially if your project involves using an extensive network of screens, complex content delivery, or advanced solutions with AI, Augmented Reality, Virtual Reality, facial recognition, or gesture recognition.
However, many companies miss including the installation and post-implementation training aspects in their digital signage game plan. In this guide, we will deep dive into and discuss the steps of digital signage installation, the primary challenges faced during the setup, and the cost budgeting.
Before installing digital signage, it is crucial to plan and prepare by identifying factors like purpose and target audience, placement of the screens, and selecting the appropriate type of digital signage.
Some of the time-consuming aspects of the planning phase can be:
Site inspection
Site surveys are crucial, especially for deploying outdoor digital signage displays. To conduct a site inspection, you will need a team of technical experts to visit the site and scrutinize potential issues related to power, internet connectivity, and environmental factors such as temperature & lighting.
For example, if the location is in a high-traffic area, the survey will help to determine if the digital signage will be visible and accessible to the target audience.
Many vital strategic decisions will rely on the result of your site inspection—for instance, the display size. A site inspection may reveal that the display size is large and that your preferred location needs more space to accommodate it. Surveying the area before installation can help your team identify additional requirements like structural support and permit acquisition.
Acquiring permits & approvals
You will need approvals before installing electronic signage displays in many cases. For example, if you install digital billboards or posters on a public street, you may need to obtain a permit from the city council or local authority. If you’re installing digital signage like a video wall at a mall, you may be required to get approval from the mall management.
The time and complexity of acquiring a permit will vary depending on the location, type of display, and the scale & duration of the project.
Installing digital signage comes with a cost, and it’s important to budget and plan for these costs in advance. The cost of digital signage includes hardware, software, installation, and ongoing maintenance.
Businesses can spread the digital signage project cost over time by considering financing options, such as leasing or renting the hardware. This can be an excellent option for companies that may not have the capital to invest in digital signage upfront.
Besides, leasing or renting the devices also allows businesses to upgrade or change their digital signage more frequently, keeping the technology updated and relevant.
Some of the common questions that businesses often have while deciding on digital signage hardware and software are:
Can I use my existing hardware for digital signage?
As a business, you might have used television sets, monitors, and tablets lying around in your offices or stores. And the first question one would ask is, “can I use my existing hardware as digital signage?”
The answer is (mostly) yes.
With an appropriate digital signage player and content management system, nearly any type of screen - be it commercial or consumer-grade, can transform into digital signage.
How to choose my digital signage hardware (If I am purchasing new ones)?
However, if you want to buy new hardware, it is important that you are aware of the key decision points to choosing the right signage player, such as:
screen resolution & viewing angle
display brightness
energy efficiency
operating hours of the players
digital signage software compatibility
What features to look for in digital signage software?
When it comes to software, there are several types of digital signage software, including content management systems, schedulers, and analytics. Many of the modern software solution providers like Pickcel offer all these features combined.
Choose a CMS that has a simple User Interface and allows anyone with zero programming knowledge to control the software. A simple experiment that you can do is show the interface to a non-tech savvy employee, friend or family member and see if you can explain its functionality to them, and more importantly if they understand it.
Pro Tip: Always take a free live demo from your software vendor and if there is a free trial, use the free trial to test drive your display management software.
The digital signage installation phase includes the hardware and software configurations.
The time taken to install a digital signage system depends on the size & location of your screen and the complexity of the project. An on-premise digital signage solution in place of a cloud-based one, for example, will take more installation time since it requires more security integrations.
Typically, it will take you 7-8 hours to install the 5-10 displays, configure the internet and the boot the digital signage software.
Many of the hardware providers offer installation services as no-cost privilege.
The installation process of the hardware typically includes the following steps:
1.Mounting the displays
The type of mounting hardware used will depend on the type of display and the surface it will be mounted on.
For example, LED or LCD flat-screens can be mounted using VESA mounts, pole mounts or ceiling mounts.
On the other hand, large outdoor installations like digital billboards will require more structural support such as a frame structure. This is because outdoor signs will have to endure several external factors like wind, vibration or even vandalism.
2.Connecting the media player to the display
The media player can be connected to the screens using HDMI or VGA cables. If you are using Smart TVs for digital signage, then your media player will be mostly built-in within the screen.
3.Configuring the media player
The media player has to be first connected to an internet source like a wired Ethernet connection, a wireless connection, or cellular connection. To configure the network, you may be required to enter the network settings such as the IP address, subnet mask, and gateway.
4.Testing the hardware
Once everything is done, before launching the software on your displays, check if the power and network cables are safely connected.
Some hardware considerations for an optimal digital signage network:
Remember that when selecting digital signage hardware, it’s crucial to consider the specifics. If you are planning to place screens in an outdoor environment, going for commercial grade TVs is the best choice as outdoor screens require higher brightness and robust weatherproofing compared to indoor screens.
Additionally, what are the operating times for the screens also matter when choosing digital displays. Consumer grade TVs are rarely made for extensive use (usually less than 16 -20 hours per week), while commercial screens are built to with stand more screen operating time and have about 3-5 years of warranty.
The installation process of the software typically includes the following steps:
1.Downloading & installing the software
Your digital signage software will have an app that needs to be downloaded on each device. Ensure that you are installing a version of the software that is updated and compatible with your hardware operating system.
For instance, if you are installing the software on a Windows system, you need to download the Windows version of the software, not an Android one.
There is nothing to worry about the software download. You can easily find your system-compatible version from the display’s app store (Google Play for Android displays, Microsoft App Store for Windows monitors, Apple Store for iPads or MacBooks, etc.) You can also download it from the the official website of your software service provider.
At Pickcel, our support team can guide you through the entire process of deploying the software.
2.Configuring your screens with the CMS
If you are using cloud-based software, you need to first create an account to access your dashboard.
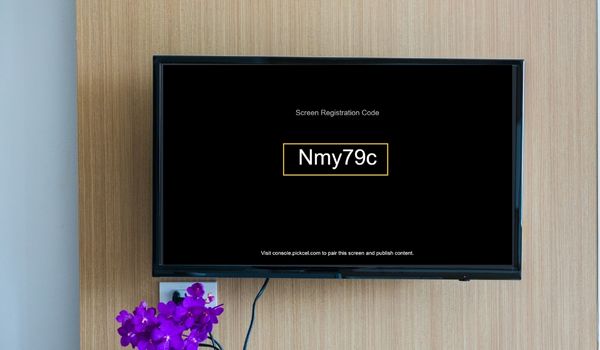
Next, you have to pair your displays (yes, much like the bluetooth pairing) with the CMS. This generally works through a unique registration code that shows up on your signage devices as soon as you boot the device app of your software.
For example, if you are pairing a display with the Pickcel CMS dashboard, you will see a code like this 👇

Once the code is added to your dashboard, the screen gets registered and you can now remotely publish content on that screen without any physical connectivity.
3.Activating the software license
If you are using on-premise software, then this step is not for you as you will have to activate the license to complete the above steps. However, if you have opted for a cloud-based software solution like Pickcel, you can avail of a free trial to test the software features on limited number of displays. In such cases, you should pick a subscription package and activate your software license as soon as you decide your software brand. Otherwise, many of your saved work during the software trial may be lost once your free trial is over.
Some software considerations for an optimal digital signage network:
On the software front, opting for a user-friendly digital signage is a must. Software that has easy-to-use interfaces, supports real-time content updating, and multi-screen management features are not some nice to haves but are crucial for seamless content workflow.
Another feature is scalability. Your digital signage software should be scalable as your business. The software should be able to support a large network of screens with unrestricted functionality.
The last but the most important factor is security. If you are in a business that handles sensitive information, security can never be an afterthought. Invest in a software that is secure and reliable.
Post installation, there will be an additional training phase. This step is crucial and can take up days or weeks. But make sure your staff gets hands-on training and all support documents & manuals to control both the digital signage hardware and software.
The key areas of post-installation training are:
CMS handling
Not everyone in your staff will be a techie. Therefore, without proper training, the digital signage content management system will become a maze to confuse and befuddle your employees. Conduct a physical or virtual workshop to train your network admins on:
Creating digital signage content (such as uploading media files, combining media files to create a composition, editing designs)
Registering new screens to the CMS
Publishing content and handling other advanced features like screen grouping, bulk publishing, etc.
Using digital signage apps to play real time content on screens
Monitoring analytical metrics like screen downtime, dwell time, viewer engagement, etc.
Maintenance and troubleshooting training
General maintenance and troubleshooting training is a mandatory step; your digital signage network will, of course, at some points, run into issues.
Your technical staff don’t have to be the expert in everything, but they should at least have the preliminary know-how of identifying the problem, running periodic diagnoses, and carry out recurring maintenance activities like installing new software updates, basic troubleshooting, and cleaning the displays.
Setting up a digital signage network can seem to be a mammoth undertaking, and it often is. That is why you should always follow a structured flow of action and plan your implementation months ahead. If you put enough effort into the planning, your subsequent steps of installation will be much smoother.
Also, an important note is to choose the correct digital signage partner for your business. Many modern solution providers like Pickcel assist you throughout the entire course of installation and staff training.
If you are looking to power your digital signage screens, you can sign up with Pickcel and enjoy all the benefits free for 14 days on two displays.
Take complete control of what you show on your digital signage & how you show it.
Start Free Trial Schedule My Demo
May 19 2023
5 min read

May 16 2023
8 min read

May 12 2023
9 min read

Apr 28 2023
14 min read