Setting Up Raspberry Pi Digital Signage with Pickcel— A Comprehensive Guide

Originally developed in the U.K. to make the learning of computer programming languages easier and fun, the Raspberry Pi computer has now turned into a popular choice of hardware all across the world.
In short, it is a DIY computer. It uses, as the Raspberry Pi Foundation itself defines, 'a credit card size' board to turn any TV or monitor into a computer capable of accessing the internet, playing games, and streaming HD content.
But beyond that, Raspberry Pi is a high-performing choice to power commercial screens i.e., digital signage screens used for advertisements, public information systems, DOOH, etc.
What is Raspberry Pi OS?
'Raspberry Pi OS' is the new name of the Raspberry Pi computer operating system. It was formerly called 'Raspbian.' Earlier, the Raspberry Pi foundation used the Linux-based Debian distro, an open-source software developed independently by Peter Green and Mike Thompson.
But, in 2020, the foundation introduced their home-grown 64-bit OS outside of the 32-bit Raspbian project and rebranded their operating system as the Raspberry Pi OS.
To know in detail what is the history of the Raspberry Pi OS, check out this informative guide by ITPro.
As already mentioned, the Raspberry Pi is a computer. But, it is not available in the market as a finished product i.e. you cannot buy a regular laptop or desktop with a Raspberry Pi system.
If you are using a Raspberry Pi for any project, you will have to purchase different parts of the computer individually and assemble it; hence the term DIY (do-it-yourself).
Raspberry Pi accessories are available solo, but you can also purchase a variety of starter kits that contain the basic components for the setup.
There are five essential pieces of the Raspberry Pi puzzle:
1. The Raspberry Pi board (the mighty brain itself!)
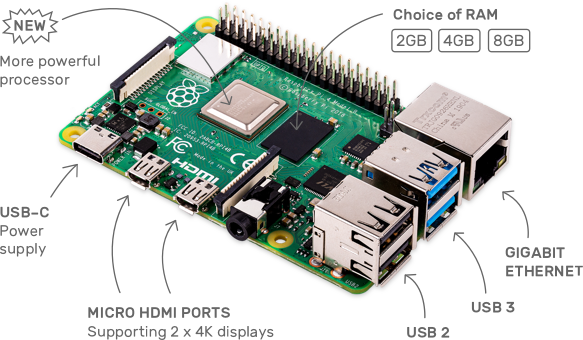
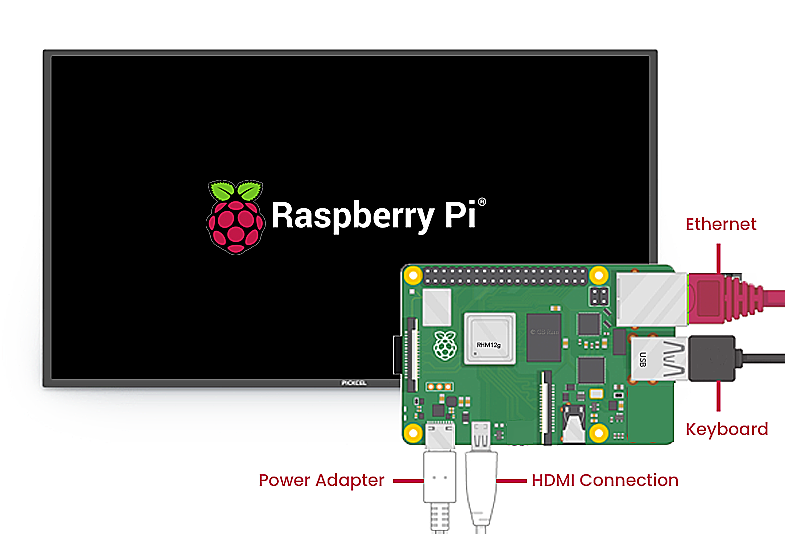
Raspberry Pi comes as unguarded single-board microcomputers and microcontrollers as shown in the image above. It carries the CPU, RAM, GPU, Xbee socket, Ethernet port, HDMI ports, power source connector, and almost everything required to run your computer.
There are more than ten models with diversified properties and varying degrees of processing power. Depending on your project, you will have to decide which Raspberry Pi model is the most suitable.
The basic model is the Raspberry Pi Zero. It is also the most affordable one, costing just a measly $5. The latest and the most powerful model is the Raspberry Pi 4 B which comes in 2 GB ($35), 4GB ($55), and 8 GB ($75) capacity.
2. Micro-SD card (the brain of the brain)
To boot your Raspberry Pi (RPi or RasPi), you will need a micro SD card. No, it is not an optional accessory. Micro SD cards are the smallest size of SD cards. They are used in all modern smartphones.
The micro-SD card acts as the hard drive of your computer. For most projects, a size of 8GB is the bare minimum. The highest size officially supported by Raspberry Pi is 32 GB.
The Raspberry Pi 4 is a 64-bit architecture; so, users can customize their SD cards beyond 32 GB. However, if you are a beginner, we recommend using 8-32 GB micro SD cards.
Apart from the storage size, the class of the micro SD card is also important. If you are using an Ultra-High Speed card, you can go for a Class 1 (UHC-1) card or higher. However, if you have a regular micro SD card, then it is recommended to use a minimum of class 10 SD cards. The class of your micro SD card affects the speed of data transfer.
You will also need an SD card reader (preferably an external USB SD card reader).
3. Power adapter (the energy middleman)
Beginners often question if they can use a phone charger to power their Raspberry Pi.
Quite frankly, that is a bad idea.
Remember that your power adapter will not only be powering the RasPi board, but also the HATs (if you are using them).
The power adapter specifications are as follows:
- Raspberry Pi 4 & Raspberry Pi 400: Minimum 5V and 3 A or higher.
- Power supply: Type C power supply.
- Raspberry Pi 2, 3, and lower: Minimum 5V and 2A (preferably 2.5A) or higher.
- Power supply: Micro USB power supply.
4. Display & display cable (the face)
Like every ready-made computer available in the market, your Raspberry Pi will also need a screen for showing images or video outputs. You can use any kind of screen, for example, TV screens, desktop monitors, or large commercial digital signage screens & video walls.
Most modern TVs and displays come with HDMI ports. So, you can easily connect a Raspberry Pi to your screen using an HDMI cable. The new Raspberry Pi 4 B model also allows you to power two displays at a time, and that too in 4K.
Raspberry Pi also supports older displays with RCA inputs. But, there is no compatibility with VGA (VGA is redundant now; only very old TVs will have VGA).
Learn how to use a TV as digital signage for running ads, showing public information, etc.
Keyboard and mouse (the limbs)
When you are building a computer, you will require a keyboard and a mouse to perform the inputs. Any keyboard and mouse are fine for Raspberry Pi except for PS2 devices.
The accessories needed for setting up a Raspberry Pi largely depend on the project you are using it. The above hardware is essential. The optional hardware includes (but is not restricted to):
- USB cables
- Ethernet cable
- Raspberry Pi case
- HATs
- Breakout boards (required for Raspberry Pi 400)
- Fans & heatsinks (required especially for Raspberry Pi 4)
- Miscellaneous
Which Raspberry Pi model is the best for digital signage?
The entire Rpi technology is experimental. And that is why it is so exciting. If you are a hobbyist or science geek, you can try setting up a digital signage system below the RasPi 3 model.
But if you are talking business, it is best to choose the Raspberry Pi 4 or at least the Raspberry Pi 3 models.
Raspberry Pi 4 as a digital signage player
RPi 4 is undoubtedly the best choice for any medium to large cloud-based digital signage project. It is quite a step up from the earlier models.
The biggest highlight of the RPi 4 model is the 4K support. In recent years, a significant number of businesses are starting to use 4K displays to show advertisements, entertainment, and other types of 'catch-the-attention' content. So, if you are using digital signage for showing ads, promotions, and playing high-quality videos, then go for the Raspberry Pi 4.
With a much better CPU performance (1.6 GHz processor) and additional memory, the new Raspberry Pi 4 can process a large volume of data. It allows you to perform several tasks on multiple tabs seamlessly.
However, Raspberry Pi—even the newest model 4B, is yet to overcome limitations like:
- overheating (in absence of cooling fans or heatsinks)
- relatively slow slide transitions
- stutters in element animations
But, if you weigh the Pros and Cons, setting up your digital signage with Raspberry Pi 4 will sound quite reasonable.
Raspberry Pi 3 as a digital signage player
Raspberry Pi 3 digital signage players are not as fast or polished as their newest sibling. Nevertheless, if you want to play content in HD or full HD displays, you can surely go for Raspberry Pi 3.
Pickcel digital signage software supports both Raspberry Pi 3 and Raspberry Pi 4 models. Check out all our supported hardware here.
Setting up Raspberry Pi digital signage with the software
Raspberry Pi is not a typical go-to signage player for businesses worldwide, at least, not as conventional or widespread as Android or Windows media players. Therefore, you must ensure that your digital signage solution platform supports your RasPi hardware.
The Pickcel digital signage software is well-supported by RPi 3 and RPi 4B models. You can directly download and install the Raspberry Pi image file along with the Pickcel software in one go. Follow the steps below (with images):
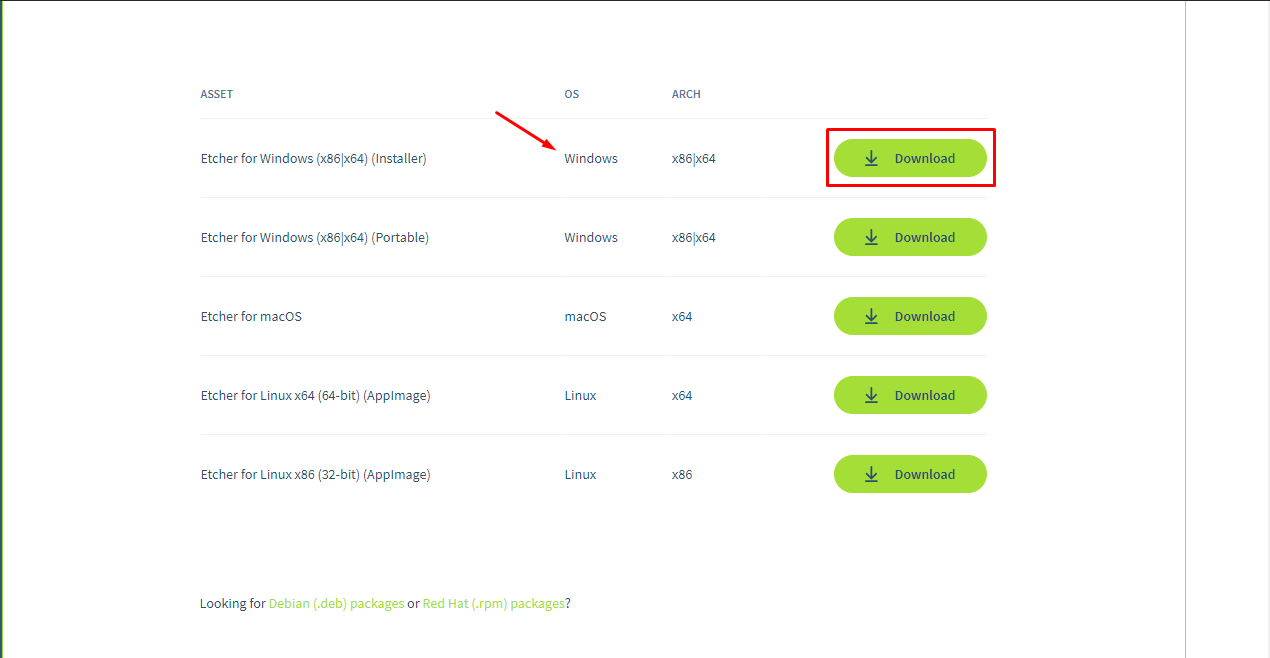
- Go to https://www.pickcel.com/download/#raspberry-pi
- Click on the 'Download' icon (down arrow) and download the file of your preference.
- Download the 'balenaEtcher' tool from this link: https://www.balena.io/etcher/
- Download the suitable tool from the list and install this tool on your device.
- Insert the SD card into the SD card reader (you may require an external USB SD card reader). Plug the SD card into your system.
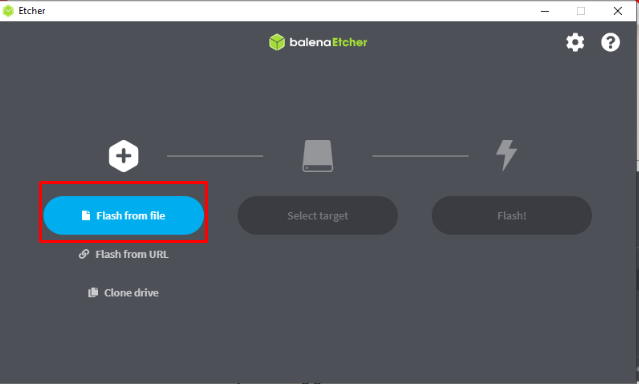
- Launch the balenaEtcher app and Click on 'Flash from file'
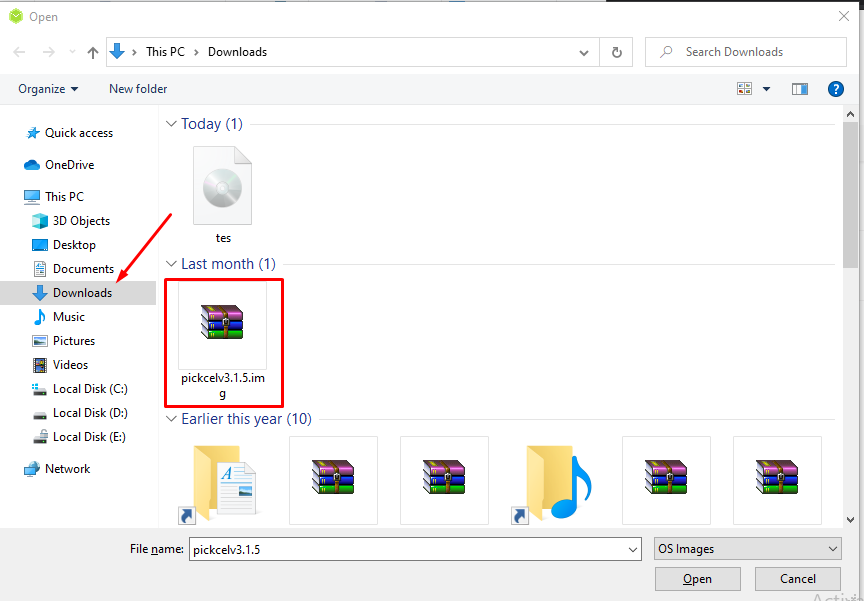
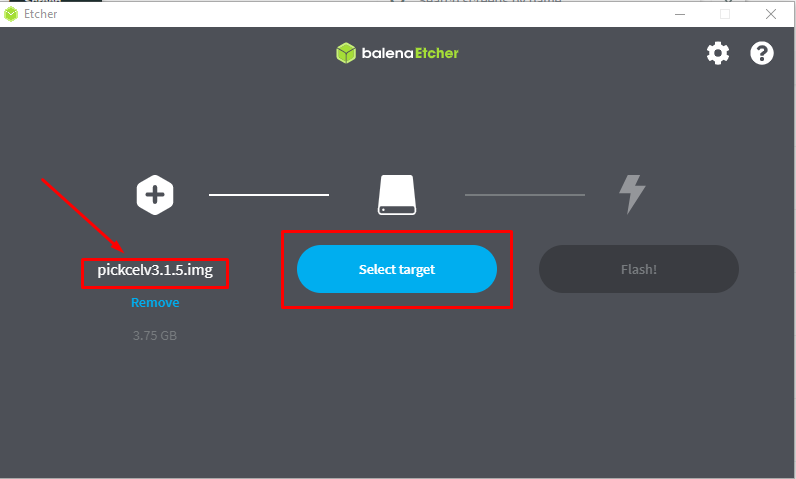
- Select the downloaded .img file and click on 'Open.'
- The selected file name will show in the tool. Click on 'Select target.'
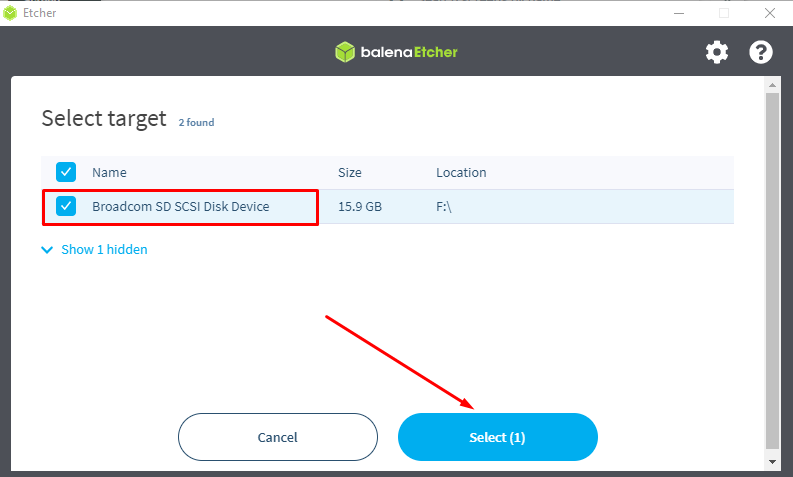
- Select the desired SD card and click on 'Select.'
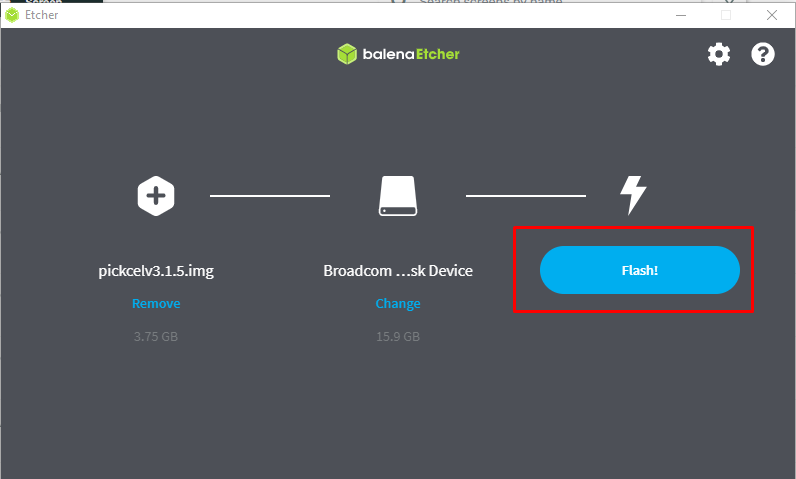
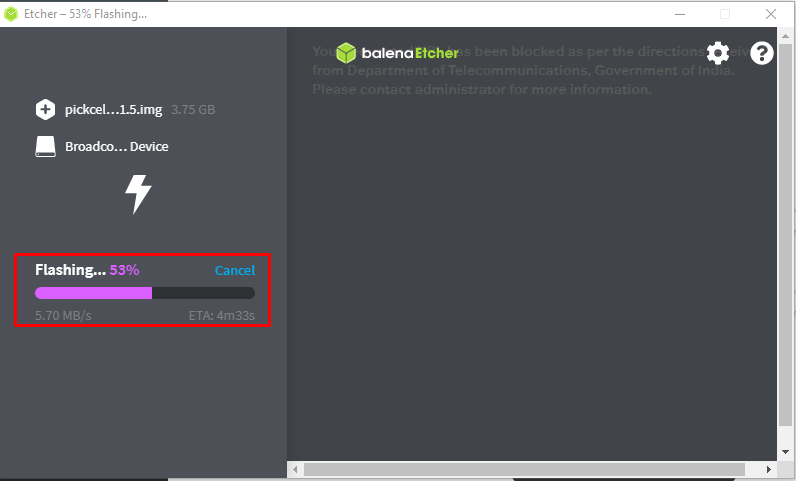
- After selecting the SD card as the target, click on 'Flash.'
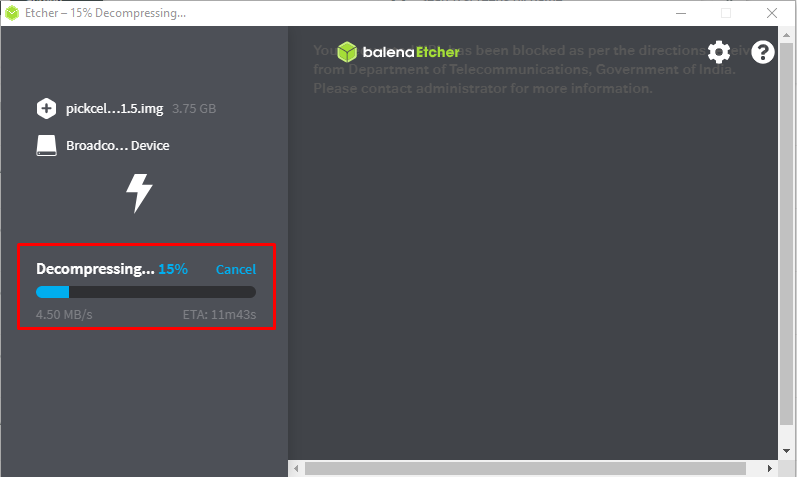
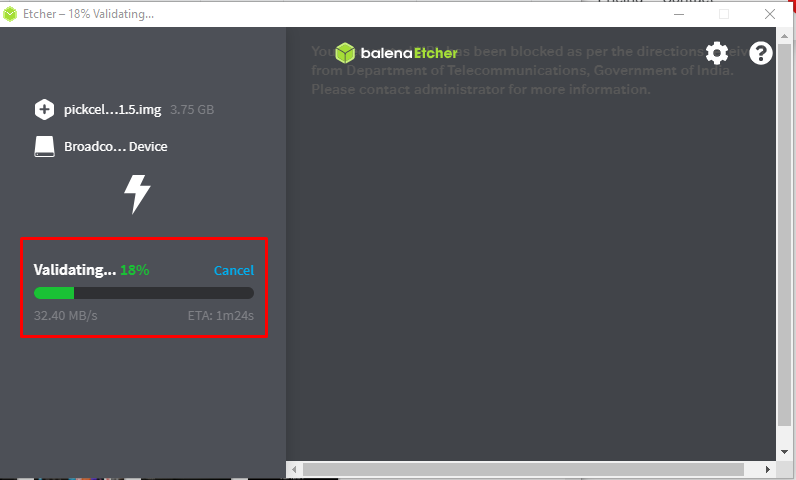
- Wait for the completion of Decompressing, Flashing, and Validating.
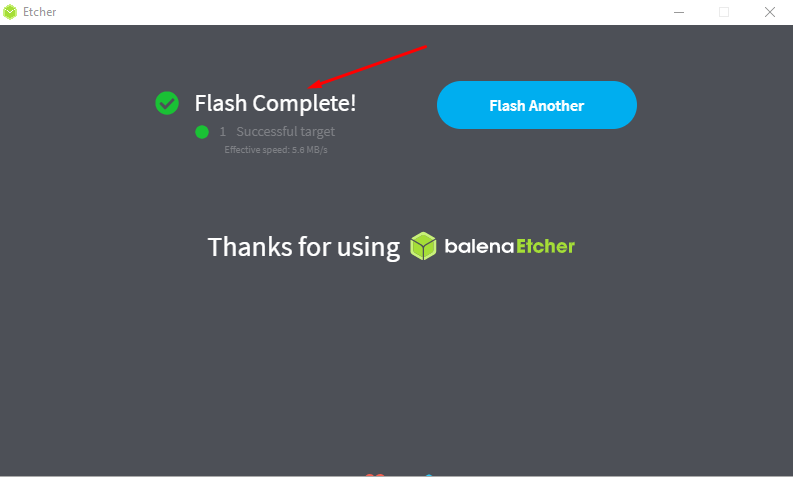
- On getting the ‘Flash Complete!' message, you can exit Etcher and eject the SD card.
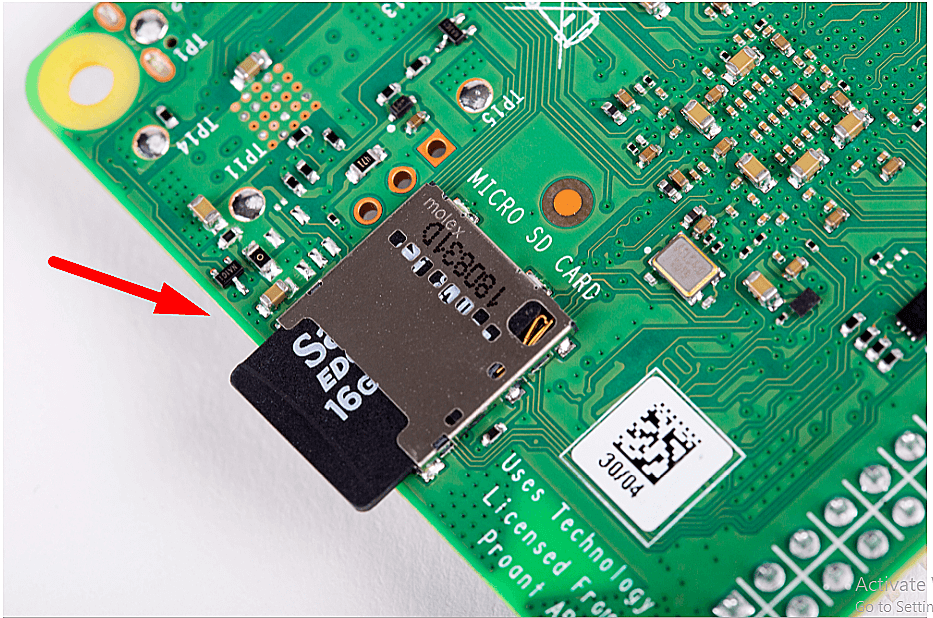
- Insert the SD card into your Raspberry Pi.
- Connect the Raspberry Pi with the HDMI cable, Ethernet cable, and power adapter.
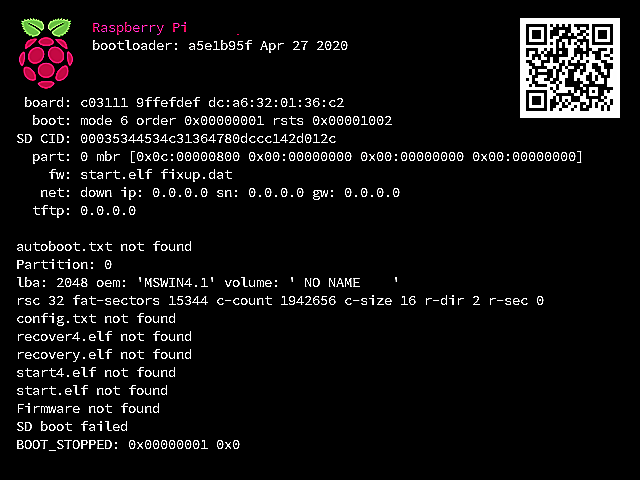
- Power on the Raspberry Pi. You should see the boot logo of Raspberry Pi OS on your screen.
- The keyboard is required for the first time only to configure the Wi-fi network.
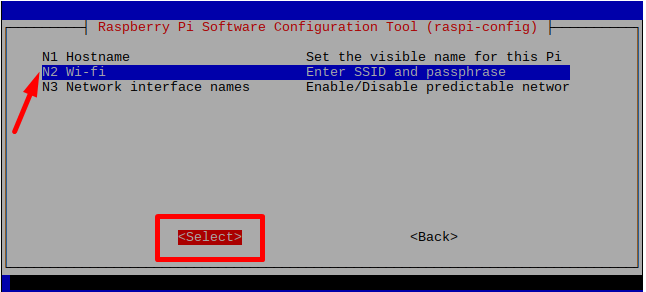
- Once the boot is complete and you can see the Pickcel app screen with no internet error, use Ctrl + Shift + N on your keyboard to open the Network - config screen.
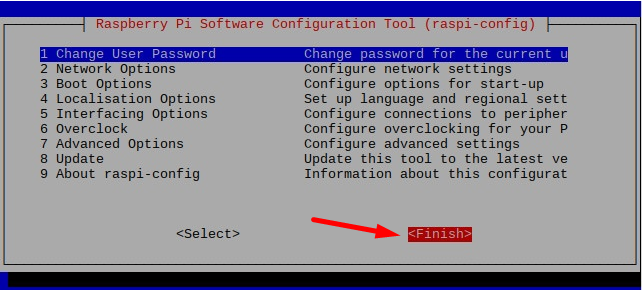
- Select from the 'Network Options' using the arrow key on the keyboard.
- Select from the 'Wi-fi' options.
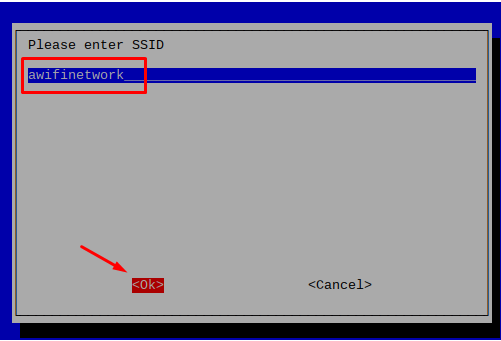
- Type 'SSID' (Wi-fi network Name) and press 'Enter'.
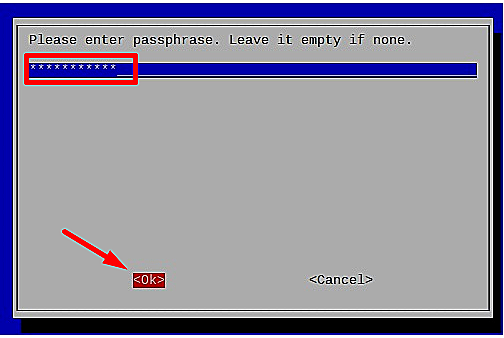
- Enter the 'Passphrase' (Password). Leave it empty if there is none. And, press 'Enter'.
- Click on 'Finish.'
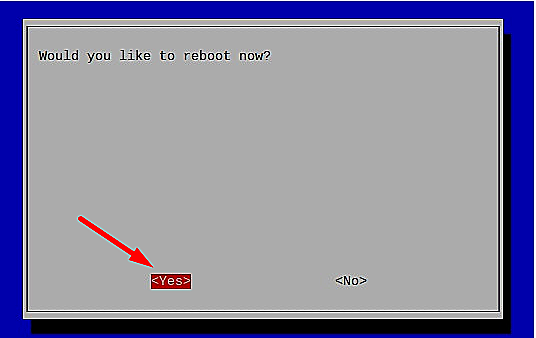
- Click on 'Yes.' This will restart the device and launch Pickcel automatically.
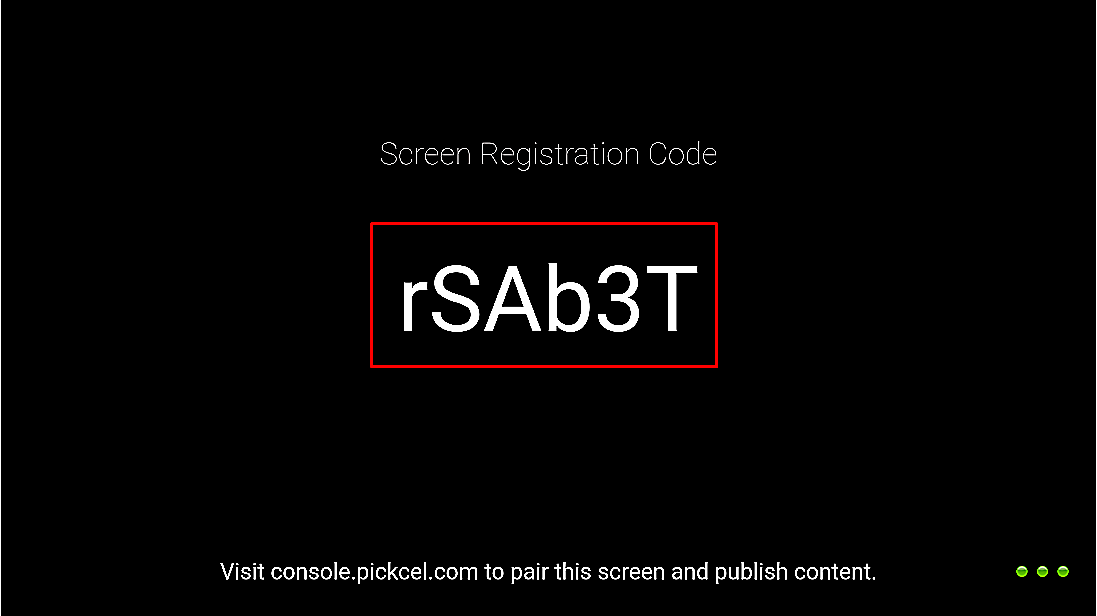
- After the Pickcel application launches, it will show a six-digit Screen Registration code on your display. Enter this code on your Pickcel console (https://console.pickcel.com/) to complete the pairing of your screen.

The 'balenaEtcher' tool is supported on Windows, Mac OS, and Linux.
Once the process starts, flashing will take some time depending upon the size of the bootable image, and the speed supported by the USB flash drive.
In case you have Ethernet connectivity with DHCP IP address and DNS setup, you may not require any configuration and hence may not require a USB keyboard.

To learn how to pair your device with the Pickcel console, click here or watch this video
Maximize your screen's efficiency with Pickcel.

Some Frequently Asked Questions (FAQs) on Raspberry Pi
1. Is Raspberry Pi an embedded system?
Raspberry Pi is not an embedded system. It does not come built-in with any device.
2. What is the Raspberry Pi operating system?
The Raspberry Pi operating system is called Raspberry Pi OS. However, many still like to call it by its former name or 'Raspbian'. The base OS of the Raspbian is Linux.
3. What is the Raspberry Pi used for?
Raspberry Pi (RasPi or RPi) is a DIY mini-computer that was originally designed to help students and tech-enthusiasts learn programming languages like Java or Scratch. However, owing to its design and cost-effectiveness, RPi is now used for a wide range of innovative DIY projects like building computers, digital signage systems, robots, social media bots, create home automation, DIY retro gaming systems, etc. The possibilities are endless.
4. Where can I buy Raspberry Pi (including the latest model Raspberry Pi 4)?
Raspberry Pi is widely available:
- Popular USA vendors: Sparkfun, Adafruit,
- Popular UK vendors: Okdo, Pimoroni, The PiHut
- Popular Canada vendors: Pishop.ca, Canakit
- Popular India vendors: FactoryForward, ThingsBits
For more authorized dealer information (country-wise) visit this page.
5. How expensive is a Raspberry Pi?
The Raspberry Pi is a very cost-effective device. The basic model (Raspberry Pi Zero) is priced at $35. However, you have to keep in mind that the Raspberry Pi board is not a complete device. The board itself may come at the price of a comfort cushion, but you will need to purchase a whole bunch of other accessory hardware to operate the Pi, and some of them are absolutely essential.
(Scroll up to see what hardware is essential to set up your Raspberry Pi.)
Nowadays, instead of buying the Raspberry Pi accessories individually, many people prefer to buy a Raspberry Pi starter kit.
Therefore, contrary to the way the product is marketed (a computer that comes at just $35), the collective cost of setup can be a little more. Nevertheless, it is still a very economic product when you come to think of its benefits.
6. What is a Raspberry Pi Starter Kit?
As mentioned before, users have to purchase all the hardware for Raspberry Pi individually and assemble them. That can be a little difficult for some people.
Therefore, many brands now sell Raspberry Pi starter kits containing the Raspberry Pi board and some essential accessory hardware. Different starter kits contain different models of Raspberry Pi. The accessory hardware also varies. So while purchasing a Raspberry Pi kit, make sure to read the description of the kit contents carefully.
Raspberry Pi itself does not manufacture or distribute these kits, but you can easily find them on Amazon. We advise you to do a little research on the best Raspberry Pi kits before you buy one.
7. Can a Raspberry Pi run 4K?
Only the Raspberry Pi 4 model can run 4K content. It is important to note that only one HDMI port supports 4K at 60Hz; the other HDMI port supports 4K at 30Hz.
8. What is Raspberry Pi digital signage?
Digital signages are displays that show informational or entertainment content for public consumption. Most businesses use digital signage to show ads, discounts & offers, product catalogs,video streaming, or corporate communications. They are also used for public communication like in airports, schools & colleges, public offices, hospitals, and so on.
Anyone can turn a display (even a dumb TV) into digital signage with the help of Raspberry Pi and a compatible digital signage software.
9. How many Raspberry Pi models are there?
Check out the list of Raspberry Pi models here.
10. Can Android or Windows OS run on Raspberry Pi?
Raspberry Pi has its own operating system called the 'Raspberry Pi OS' (formerly called the 'Raspbian'). Other operating systems like Windows and Android can be installed on Raspberry Pi (available as a modded OS from a third-party source.) However, it is generally unadvised because modded OSs bring instability to the platform. Also, many applications will fail to work on a modded OS.
11. Can I use a Raspberry Pi as a computer?
Yes, Raspberry Pi can be easily turned into a desktop or laptop by assembling different hardware like monitor, keyboard & mouse, microSD card, etc.
12. Can I use a Raspberry Pi as a smart TV?
Smart TVs come with an in-built media player. Therefore, you do not need to connect a Raspberry Pi. However, you can add smart TV features to dumb TVs by connecting a Raspberry Pi to the HDMI source of your TV.
13. Can I connect Raspberry Pi 4 to a TV?
Yes. Make sure your TV has an HDMI input.
14. How do I set up a Raspberry Pi?
Learn how to set up a Raspberry Pi with this RPi guide.
15. What is the newest Raspberry Pi raspberry-pi-4-model-b?variant
The most recent model is Raspberry Pi 4B (released in June 2019).
16. Who uses the Raspberry Pi? / Who is Raspberry Pi suitable for?
The user base of Raspberry Pi is as diverse as its applications. Students can use it for learning programming. Tech enthusiasts and hobbyists can use RasPi for DIY projects like home automation, robotics, etc. Nowadays, businesses use RPi for streaming content on their digital signage.